Beranda
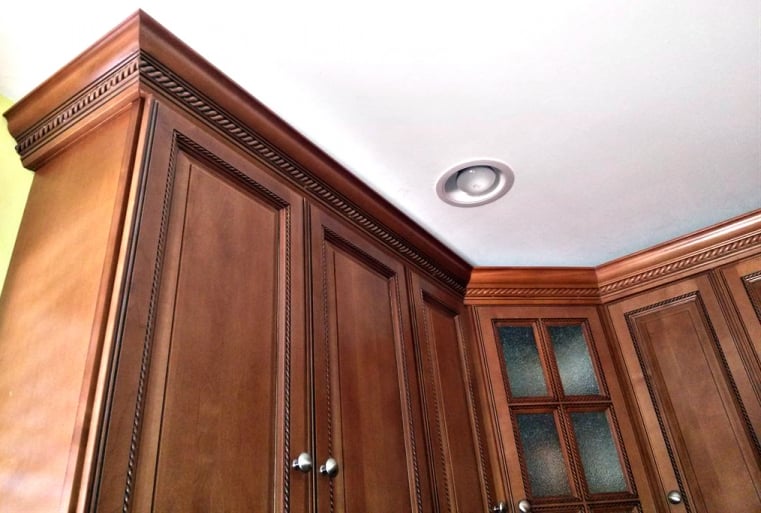
/ How To Install Crown Molding On Kitchen Cabinets / Install Kitchen Cabinet Crown Moulding - Measure and cut the crown molding front section measure and mark the front section of crown molding to the cabinet width.
How To Install Crown Molding On Kitchen Cabinets / Install Kitchen Cabinet Crown Moulding - Measure and cut the crown molding front section measure and mark the front section of crown molding to the cabinet width.
Insurance Gas/Electricity Loans Mortgage Attorney Lawyer Donate Conference Call Degree Credit Treatment Software Classes Recovery Trading Rehab Hosting Transfer Cord Blood Claim compensation mesothelioma mesothelioma attorney Houston car accident lawyer moreno valley can you sue a doctor for wrong diagnosis doctorate in security top online doctoral programs in business educational leadership doctoral programs online car accident doctor atlanta car accident doctor atlanta accident attorney rancho Cucamonga truck accident attorney san Antonio ONLINE BUSINESS DEGREE PROGRAMS ACCREDITED online accredited psychology degree masters degree in human resources online public administration masters degree online bitcoin merchant account bitcoin merchant services compare car insurance auto insurance troy mi seo explanation digital marketing degree floridaseo company fitness showrooms stamfordct how to work more efficiently seowordpress tips meaning of seo what is an seo what does an seo do what seo stands for best seotips google seo advice seo steps, The secure cloud-based platform for smart service delivery. Safelink is used by legal, professional and financial services to protect sensitive information, accelerate business processes and increase productivity. Use Safelink to collaborate securely with clients, colleagues and external parties. Safelink has a menu of workspace types with advanced features for dispute resolution, running deals and customised client portal creation. All data is encrypted (at rest and in transit and you retain your own encryption keys. Our titan security framework ensures your data is secure and you even have the option to choose your own data location from Channel Islands, London (UK), Dublin (EU), Australia.
How To Install Crown Molding On Kitchen Cabinets / Install Kitchen Cabinet Crown Moulding - Measure and cut the crown molding front section measure and mark the front section of crown molding to the cabinet width.. Dry fit the crown molding by holding the front piece and a side piece against the front and side of the baseboard (image 1). Ensure that the molding is the correct size to fit the space. When installing on a wall, use the pneumatic nailer to secure the crown molding at the wall studs. I attached the crown molding to the ripped down 1x6 with 3/4 brads. This video teaches you how to install crown molding on cabinets with clever tricks and tips it would take you years to learn on your own.
Mark all sides of the cabinet onto which you will be attaching crown moulding. Provide a nailing surface for crown moulding by attaching solid wood mounting strips to the top edges of the cabinets. Start by assessing the cabinets. The extra length will help push the cope joint closed when installing crown moulding. How to install crown molding on kitchen cabinets.
How Much Does Crown Molding Cost Angi Angie S List from media.angi.com Place the crown molding at the top of the riser so it touches the ceiling and nail it in place to the riser (image 2). Installing first cabinets a few quirks with molding browse moldings and accents kraftmaid cabinetry with images how to install kitchen cabinet crown molding kraftmaid maple large crown molding kitchen cabinet ceiling how to install kitchen cabinet crown molding molding and accent details large cove kraftmaid. The cleats act as a brace to keep the molding straight across the cabinets during installation. (use one long strip for a row of cabinets the same depth.) then apply wood glue to each strip, nail it in place, and let dry. These filler wood pieces should be held with screws on the top of the cabinets. Cut crown molding for side of cabinet action the length of the side items. As you mount the wood to the top of the cabinet, make sure it sits flush with the door. Crown molding that sits atop kitchen cabinets gives them a solid, finished look.
Place your tape measure on the edge of the crown and extend it to the length of one cabinet side.
Attach three additional pieces of crown molding to the cabinet, lining the pieces up together. Once you're sure the joints fit, you're ready to install the crown moulding. Miter that end of this strip and then attach it to the backing wood with the nail gun. Then, mark the molding to guide you for the second cut. Installing a kitchen cabinet crown molding to ceiling may seem a bit tough for the first time. Installing first cabinets a few quirks with molding browse moldings and accents kraftmaid cabinetry with images how to install kitchen cabinet crown molding kraftmaid maple large crown molding kitchen cabinet ceiling how to install kitchen cabinet crown molding molding and accent details large cove kraftmaid. Cut a molding strip at least 8 inches longer than the length of the front of your cabinet. Paint or stain to your preference. Cut a mating angle on the next piece of crown, then apply carpenter's glue to end of molding. Place the crown molding at the top of the riser so it touches the ceiling and nail it in place to the riser (image 2). Ensure that the molding is the correct size to fit the space. Flex the moulding in place. Installing kitchen cabinet molding step 1 measure the space between the top edge of the cabinets and the ceiling.
Installing kitchen cabinet molding step 1 measure the space between the top edge of the cabinets and the ceiling. Hold the second piece of crown tight against the first piece, then nail it to the cabinets. Ensure that the molding is the correct size to fit the space. Provide a nailing surface for crown moulding by attaching solid wood mounting strips to the top edges of the cabinets. Paint or stain to your preference.
Crown And Starter Molding Kraftmaid from cdn11.bigcommerce.com The cleats act as a brace to keep the molding straight across the cabinets during installation. Hold the second piece of crown tight against the first piece, then nail it to the cabinets. Measure and cut the crown molding front section measure and mark the front section of crown molding to the cabinet width. Mount the crown molding to the cabinet using the brad nailer. How to install crown molding on kitchen cabinets. If your crown is too short to cover the length of a side, you can combine two straight pieces together using a thin layer of glue. Cut one side of the molding with this setting. Cheap wood tends to split, crack, and warp when compared to mdf.
Place the crown molding at the top of the riser so it touches the ceiling and nail it in place to the riser (image 2).
Mount the crown molding to the cabinet using the brad nailer. Installing kitchen cabinet molding step 1 measure the space between the top edge of the cabinets and the ceiling. Make a square cut on the uncoped end of the crown moulding. Use a pencil to mark the exact spot that needs to be cut. In this video we will go over some tips and tricks that might help whe. Cut one side of the molding with this setting. Crown molding installation labor, basic basic labor to install crown molding with favorable site conditions. Dry fit the crown molding by holding the front piece and a side piece against the front and side of the baseboard (image 1). Provide a nailing surface for crown moulding by attaching solid wood mounting strips to the top edges of the cabinets. Watch this video and even your first crown molding installation will look neat and professional. Make sure you secure the woodblock to the cabinet first and then nail the crown molding to that. Flex the moulding in place. Hold one piece of crown molding along the top of the cabinet.
Step 2 attach the cleats on to the cabinets, spacing them out evenly. Then, mark the molding to guide you for the second cut. Mark all sides of the cabinet onto which you will be attaching crown moulding. Ask this old house general contractor tom silva installs crown molding on kitchen cabinets with full overlay doorssubscribe to this old house: Repeat this process with another piece of crown molding.
Adding Height To The Kitchen Cabinets Tempting Thyme from temptingthyme.com Miter that end of this strip and then attach it to the backing wood with the nail gun. Quantity includes typical waste overage, material for repair and local delivery. The extra length will help push the cope joint closed when installing crown moulding. Using a nail gun, nail the crown to the baseboard. Ensure that the molding is the correct size to fit the space. When installing the top of a cabinet, space the finish nails about 12 to 16 inches apart. In this video we will go over some tips and tricks that might help whe. How to install crown molding on kitchen cabinets.
Once you're sure the joints fit, you're ready to install the crown moulding.
Installing kitchen cabinet molding step 1 measure the space between the top edge of the cabinets and the ceiling. Installing first cabinets a few quirks with molding browse moldings and accents kraftmaid cabinetry with images how to install kitchen cabinet crown molding kraftmaid maple large crown molding kitchen cabinet ceiling how to install kitchen cabinet crown molding molding and accent details large cove kraftmaid. Start by assessing the cabinets. (use one long strip for a row of cabinets the same depth.) then apply wood glue to each strip, nail it in place, and let dry. Repeat for each cabinet side. Cut one side of the molding with this setting. House flipping brothers dave and rich show how to install kitchen cabinet crown molding and trim with tips.this video covers all aspects of cabinet molding i. Check out our video review and demo of adding crown molding to your kitchen cabinets. Miter the edge that meets the first strip of crown molding and hold the ends together. Provide a nailing surface for crown moulding by attaching solid wood mounting strips to the top edges of the cabinets. As you mount the wood to the top of the cabinet, make sure it sits flush with the door. These filler wood pieces should be held with screws on the top of the cabinets. So, without further delay let's jump into the details.